Mexican Rice

Well foodie friends this week I got strong cravings for Mexican food, when I was in Mexico this last summer I had some of the best food ever!  My favorite food has and probably always will be Mexican Rice.  However, the box kind you can get at the store just doesn’t do it justice.  So I decided to try and make some at home that would be just what I was looking for.

Mexican Rice

Ingredients
-1/4 cup cooking oil-1 cup raw rice (I used brown rice)
-1 cove of garlic, minced
-1/4 cup diced onions
-1 chicken bouillon cube
-1 1/2 cups hot water
-8 oz tomato sauce
-salt and pepper
-1/4 teaspoon dried cilantro
-1/2 tablespoon taco seasoning

Directions
1. In hot oil, fry rice, garlic, and onion until rice is golden brown
2. Dissolve bouillon cube in hot water, add to rice
3. Add tomato sauce, salt and pepper to rice.  Mix well.
4. Bring mixture to a boil, stirring occasionally.
5. Lower heat and put lid on pan. Cook covered for 20-25 minutes or until all liquid had been absorbed.  6. Add cilantro and taco seasoning.  Mix well. Serve

I really thought this recipe was great.  At the end just before it was completely done I added some frozen veggies to the mix to get some extra veggies in my meal.  It was delicious.  I did find that it took a little bit closer to 30 or 35 minutes for my rice to be done.  I doubled my recipe also so I would have extras.

With my extras I used it as filling to make quesadillas the next night.  I filled my shell with chicken, veggies, and rice and it was so great.  I put a thin layer of Greek yogurt on my shell before adding the other ingredients and then folded it up and heated it.  I got this really cool quesadilla maker, panini press combo for Christmas from my parents.  But you could just heat it on the stove in a large pan.  So good!

I hope you guys love this as much as we did!  It is a close second to Mexico, however any time your eating on the beach is best!!  🙂

Happy Eating!

Vegetable Tian

This week I wanted to do a clean eating recipe, something that was healthy, low calorie, and not full of preservatives.  That is where I found this recipe.  It is cheap to make and pretty tasty.

Ingredients:
1 TBSP Olive Oil
1 Medium Yellow Onion
1 tsp Minced Garlic
1 Medium Zucchini
1 Medium Yellow Squash
1 Medium Potato
1 tsp Dried Thyme
Salt
Pepper
1 Cup Shredded Italian Cheese

IMG_0037

Directions:
1). Preheat the oven to 400 degrees.  Finely dice onion and minced garlic.  Saute both in a skillet with olive oil until softened.
2). While they are sauteing, thinly slice the vegetables.
3). Spray the inside of an 8×8 baking pan.  Spread the onion and garlic mixture at the bottom of the dish. Place the thinly sliced vegetable in the baking dish vertically, in an alternating pattern.  Sprinkle generously with salt, pepper, and thyme.
4). Cover the dish with tin foil and bake for 30 minutes. This is very important, without tin foil the vegetables will dry out.  Remove the foil, top with cheese and bake for another 15 to 20 minutes until cheese is golden brown.

IMG_0038

Changed I Would Make:
When I make this next time I will add in a tomato for an added flavor.  I would also add slices of pepperoni or salami to add some meat to it.

I liked the squash, it added a nice sweet flavor to the dish.  My fiance thought it tasted to “healthy” he thought that it needed more meat and with all the vegetables.  I would like to try it again with the additions I mentioned above.

If you think of any other ideas to make this recipe even better, or have any other yummy recipes let me know.  Happy eating!!

Yummy Dinner Idea- Stuffed Chicken Breast and Sweet Potato

This week I was really craving sweet potatoes, I couldn’t get it off my mind how yummy one sounded.  So I decided to make them as well as chicken breast and some green beans.  I night of some of my favorite foods.

Baked Chicken Parmesan
Ingredients:
4 chicken breasts, fat trimmed
3/4 Cup seasoned bread crumbs, I used Italian
1/4 Cup grated Parmesan cheese
2 TBSP butter, melted
3/4 Cup reduced fat mozzarella cheese
1 Cup marinara sauce
Cooking Spray

IMG_0018

Directions:
1.) Preheat oven to 450, spray a large baking sheet lightly with cooking spray.
2.) Combine breadcrumbs and Parmesan cheese in a bowl.  Melt butter in another bowl. 
3.) Tenderize chicken breast, then using a sharp knife make a slit in the middle of each chicken breast, just long enough to make a pocket.  Season with salt and pepper and fill with mozzarella cheese.
4.) Roll up chicken breast, lightly brush with butter and roll in the bread crumbs, place onto baking sheet. Repeat with remaining chicken.
5.) Lightly spray with a little more oil and bake in oven for 20 minutes.  Turn chicken and bake for another 5 minutes.
6.) Remove from oven, sprinkle mozzarella cheese on chicken and spoon 1 TBSP of marinara sauce over each breast.  Return to oven for 5 minutes or until cheese is melted.

IMG_0019

This recipe was 270 calories, 9.5 grams of fat, 31.5 grams of protein, and 14 carbs.  It was easy to make and was pretty quick as well.  The cheese and marinara sauce really helped to keep the chicken moist and yummy.  This recipe was a win, my fiance loved it!  He talked about it for the rest of the night and told me how great it was, reminding me to keep this recipe and make it again soon.

Sweet Potatoes
For my sweet potato I wanted something that was easy and would only take a few minutes, and allow me to make them on the go since I love them so much!  My fiance claimed he did not like sweet potatoes before I made these said they were gross and was not to happy when I told him I made them for dinner.  However, by time he took one bite of this one he LOVED it.  Ate the whole thing and said I should make them again,  that is what I call a win! 🙂

I used to microwave to make my sweet potato, I figured this would be a nice change for those of you who are stuck in a dorm or just want a quick treat like me.

Steps for Microwave Sweet Potato:
1.) Scrub the sweet potato under running water with a scrubbing brush.
2.) Poke holes into your potato using a fork, about eight or nine times all over the potato.  This is very important not to skip, if you do your potato could explode in the microwave causing a huge mess, and an unneeded heart attack.
3.) Take a full size paper towel and get it wet with cold water.  Ring it out carefully not to rip the paper towel.
4.) Place potato in the middle of the paper towel and loosely fold over both sides covering the potato.  Then fold over the ends loosely to help keep steam in but not to tightly that air can’t get in as well.  This will create a steaming effect.
5.) Microwave for about 7 minutes, some will take less time some a little more depending on the size of the potato.
6.) After microwaving let cool for a few minutes.

If you would like to load you sweet potato here is a great mixture to use:
2 TBSP melted butter
2 TBSP brown sugar
2 tsp vanilla extract

Cut potato length wise, drizzle a little bit of the brown sugar mixture inside.  Add a layer of marshmallows, drizzle another layer of brown sugar mixture, and one more layer of marshmallows.  Broil for about 30 seconds or until marshmallows are golden brown.

Hope you guys love this weeks recipes! Let me know what you think in the comment section! Happy eating!

Mini Egg White Omelets

Hey guys!! This week I found a recipe that I fell in love with! I actually made it three times this week, Mini Egg White Omelets.  They make the perfect breakfast, you can keep them in the fridge and they will stay fresh for up to 4 days.  They are simple, low calorie, and so tasty!

FullSizeRender 8

Ingredients:
3 cups egg whites
1 green bell pepper
1/2 cup shredded cheddar cheese

Directions:
1. Preheat oven to 350 degrees.  Grease a muffin tin.
2. Chop green pepper, and any other items you would like in your mini omelet.  Ideas I am going to try in the future are: onion, ham, hash browns, jalapeños, and spinach.
3. Fill each space with desired amount of filling I used about a teaspoon of green pepper in each space.
4. Fill each with 1/2 cup egg whites.
5. Place in oven and bake for 12 minutes, remove from oven and sprinkle teaspoon of cheddar cheese over each.  Place back in the oven for 3 minutes.

Cook Time: 15 Minutes     Prep Time: 5 Minutes     Total Time: 20 Minutes

FullSizeRender 9

These Mini Egg White Omelets are so delicious!  They are easy to make I put them in the oven and took a shower until the time went off.  They are easy to change up and make different so you aren’t eating the same thing everyday to, changing the vegetables, the cheese, or adding some meat are simples ways to make different each time you have them.  They are something that is easy to grab on your way out the door or a nice breakfast to eat after a morning workout.  They have lots of protein and very low calories which I love.  They leave you feeling full and don’t have the calories that cereal or pancakes do.

For the egg whites, you can either remove the yoke of each egg you use.  Or most grocery stores sell a carton of egg whites which is what I used.  Either will work great the kind that come in the carton are just a little more convenient if you are constantly running behind in the morning like me.

These quick breakfast omelets are just about 40 calories a piece and have 5 grams of protein.  They pair perfectly with fruit, toast, or an English Muffin.  They make a great grab and go breakfast and are a healthy way to start the day.

IMG_0013

Let me know what you thought of this recipe in the comment section.  Happy eating!!

Red Velvet Trifle-Valentine’s Day Treat

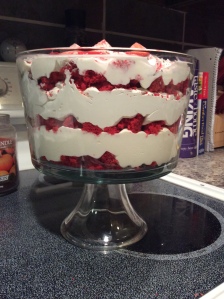
This coming Saturday, Valentine’s Day will be upon us.  So I thought it would be a great time to make a dessert perfect for the holiday.  Red Velvet Trifle, a very yummy dessert that will be a great treat for the occasion.  It is a very simple dessert, and something that you could make before you head to a party, or before your significant other came over for a special Valentine’s Day Dinner.
IMG_3130

Ingredients
1 Red Velvet Cake- you can use a store bought mix or this recipe is great
16 oz. Whipped Cream
1 package of instant pudding Cheesecake flavor
1 package of cream cheese
1/2 cup sugar
1 teaspoon of vanilla
White chocolate bar
Strawberries (for garnish)

Directions
1. Mix and bake red velvet cake
2. Let cake cool completely
3. Mix pudding per box directions, once set mix in 8 oz. of whipped cream
4. In a separate bowl, mix softened cream cheese with the other 8 oz. of whipped cream. Mix in sugar and vanilla.  Mix well.
5. Keep bowls in refrigerator until cake is ready.
6. Once the cake is cool, remove from pans and cut into small squares.
7. Place a layer of cake at bottom of bowl, then saved white chocolate on top of that, and then pudding mixture.
8. Place another layer of cake, and white chocolate, then a layer of cream cheese mixture.  Then another layer of cake and white chocolate.  Place the remaining pudding mixture on top.
9. Finish with shaved chocolate, and strawberries if desired.
IMG_1469

Final Thoughts:
Next time I make this dessert there are a few things that I would change to make it a lower calorie, healthier dessert.  In the cake mix I would omit one egg to reduce the cake by 71 calories.  I would also use lite whipped cream instead of regular whipped cream to reduce recipe by 125 calories.  In the pudding mixture I would use almond milk in place of 1% milk to reduce the mixture by 80 calories.  In the cream cheese mixture, I would use neufchatel cheese instead of cream cheese.  That would reduce the recipe by 76 calories.  I would also use Splenda baking mix instead of sugar to reduce the recipe by an additional 339 calories.

In total, making these changes would lower the recipe by 691 calories.

Recipe For Low Calorie Version:
1 Red velvet cake (omit one egg)
16 oz Lite Whipped Cream
1 package instant pudding mix Cheesecake flavored
1 package Neufchatel cheese
1/2 cup Splenda Baking Blend granulated sugar
1 teaspoon vanilla
White Chocolate barStrawberries (for garnish)

I hope you enjoy this yummy recipe, if you have any ideas for future recipes please comment below.  Happy eating, and happy Valentine’s Day!

Stuffed Peppers

Today I made my first recipe for my independent learning project.  SO EXCITING! I thought and thought and couldn’t decide what kind of food would be best to start such an exciting journey with.  Finally it came to me, let’s make a classic food that I love.  So I decided that I would do Stuffed Peppers.

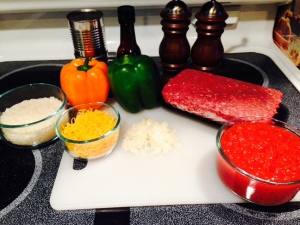
Ingredients:
6 bell peppers any color
Salt and pepper
1 pound ground beef
1/3 cup chopped white onion
1 can whole diced tomatoes
1 teaspoon Worcestershire sauce
1/2 cup uncooked rice
1/2 cup water
1 cup shredded Cheddar cheese
2 cans condensed tomato soup
SubstandardFullSizeRender-1 2
Photo CC by Kelsey Petersen

Directions:
1. Bring a pot of water to a boil.  Cut the tops off of the peppers, remove seeds.  Blanch peppers for 5 minutes. Drain and sprinkle salt inside each pepper.
2. In a large skillet, saute beef and onion for 5 minutes until browned and drain.  Season with salt and pepper.  Stir in tomatoes, rice, water, and Worcestershire sauce. Let simmer for 15 minutes or until rice is tender.  Remove from heat and add cheese.
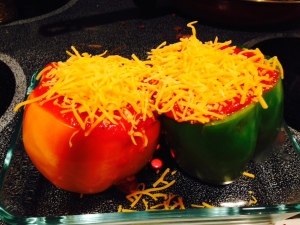
3. Preheat oven to 350 degrees.  Fill peppers with beef mixture.  Place peppers upright in a baking dish and pour tomato soup over peppers.  Sprinkle with cheese.
4. Bake covered for 25 minutes, until heated through and cheese is melted and bubbly.

SubstandardFullSizeRender-2
Photo CC by Kelsey Petersen

What I changed as I cooked:
After a little taste test I thought that the meat mixture was missing something, so I added about a teaspoon or basil and oregano, and an extra teaspoon of Worcestershire as well.  Then I decided it didn’t have the Mexican flavor I was going for so I decided to add a teaspoon of taco mix as well.  The next thing that I did was sprinkle a little cheese into the bottom of each pepper to give the cheese taste even down to the last bite.

SubstandardFullSizeRender
Photo CC by Kelsey Petersen

Final thoughts:
I really liked this recipe, it was a little different than what I have made in the past but it is definitely one I will make again.  Pretty simple and very good.  It took about 45 minutes from start to finish so it wasn’t terribly time consuming either.  I think this could be really made into a smaller version and made an appetizer also.  I really liked the recipe and it was very filling.  It has earned its way into my recipe box.

SubstandardFullSizeRender-3
Photo CC by Kelsey Petersen

If you do make this recipe at home I would love to hear how it turned out for you and what your thoughts were.  Any changes you made or additional thoughts, let me hear them.  Happy eating followers!!